

How to Install a Ceiling Fan: Step-by-Step Guide (Plus Cost)
A ceiling fan can make a room feel several degrees cooler, cut your air conditioning costs and add style at the same time. The good news is that replacing an old light fixture with a fan is a manageable weekend project for many homeowners. This guide explains how to install a ceiling fan step by step, including the tools you need, how to wire it and the safety checks you should never skip.
Quick answer: To install a ceiling fan, turn off the power at the breaker, remove the old fixture, make sure the electrical box is rated for ceiling fans, attach the mounting bracket, hang the motor, connect the wires (black to black, white to white, ground to green or bare copper, and blue to the light or second switch wire), then attach the canopy, blades and light kit. Most installs take 1 to 3 hours, and hiring a pro usually costs about $100 to $300 when wiring already exists.
Before You Start: Safety First
Working with electricity is serious. If you are not comfortable with basic wiring, or if there is no existing light fixture or wiring in the ceiling, hire a licensed electrician. Running new wires or adding a switch usually requires electrical work that may need a permit under local code.
- Turn off the power at the breaker, not just the wall switch.
- Test the wires with a non-contact voltage tester before touching them.
- Use a sturdy ladder and get a helper to hold the fan motor, which can weigh 15 to 50 pounds.
- Read your fan’s manual, because models vary.
Tools and Materials You Will Need
- Ceiling fan kit (with mounting bracket, hardware and wire connectors)
- Fan-rated electrical box and brace, if your box is not fan-rated
- Non-contact voltage tester
- Phillips and flat-head screwdrivers
- Wire stripper
- Step ladder
- Drill or impact driver
- Extra wire nuts and electrical tape
Choose the Right Fan Size and Height
A fan that is too small will not move enough air, while one that is too big can feel overpowering. Use room size to pick the blade span:
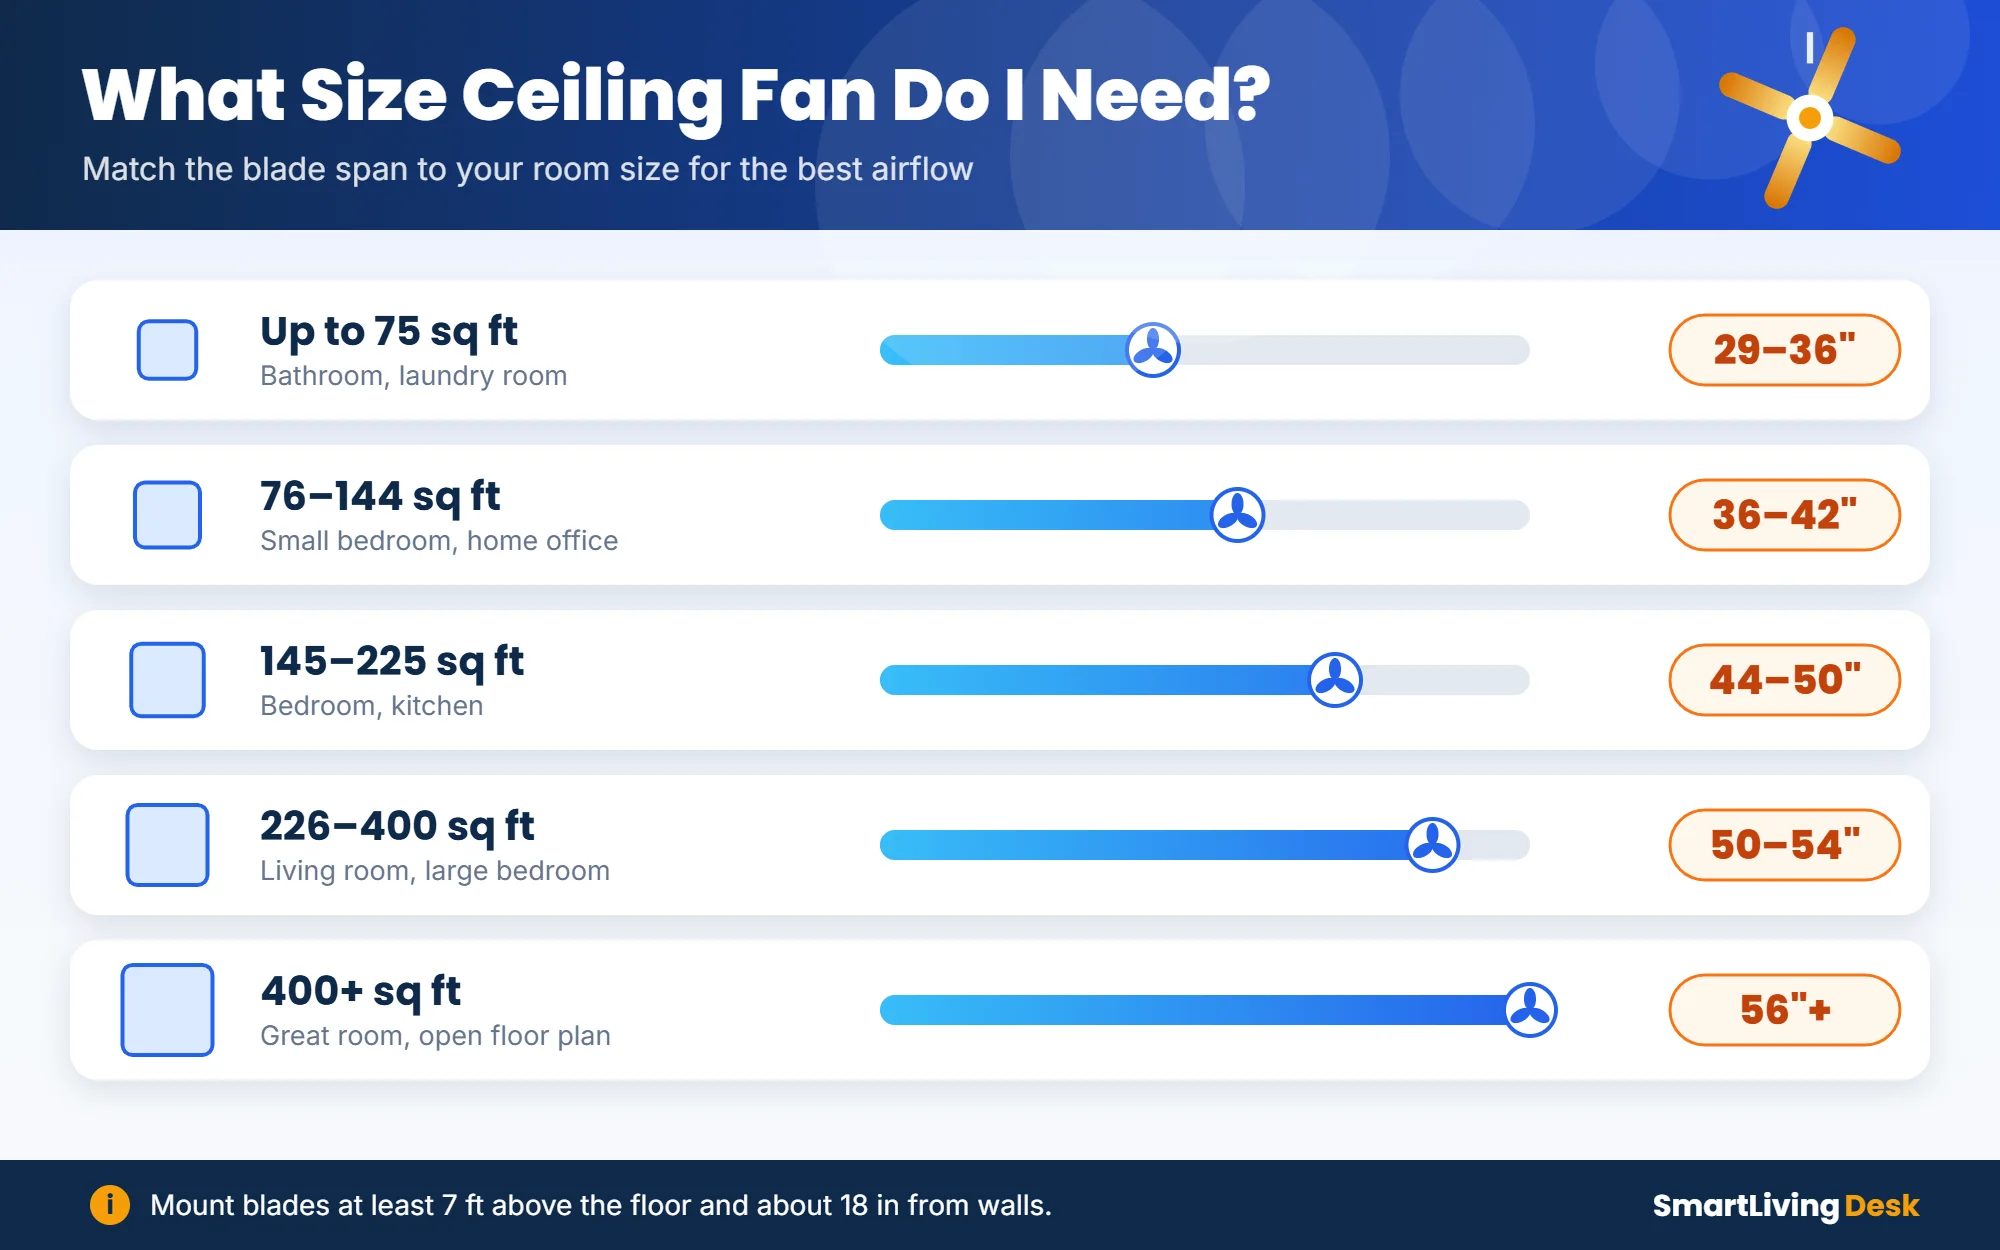
For safety, the National Electrical Code requires fan blades to be at least 7 feet above the floor. About 8 to 9 feet is ideal for airflow. Keep blades at least 18 inches from walls. For ceiling height, use this guide:
| Ceiling height | Mount type |
|---|---|
| Under 8 feet | Flush mount (hugger) fan |
| 8 feet | Standard mount with a short downrod |
| 9 feet | 6-inch downrod |
| 10 feet | 12-inch downrod |
| 12 feet | 24-inch downrod |
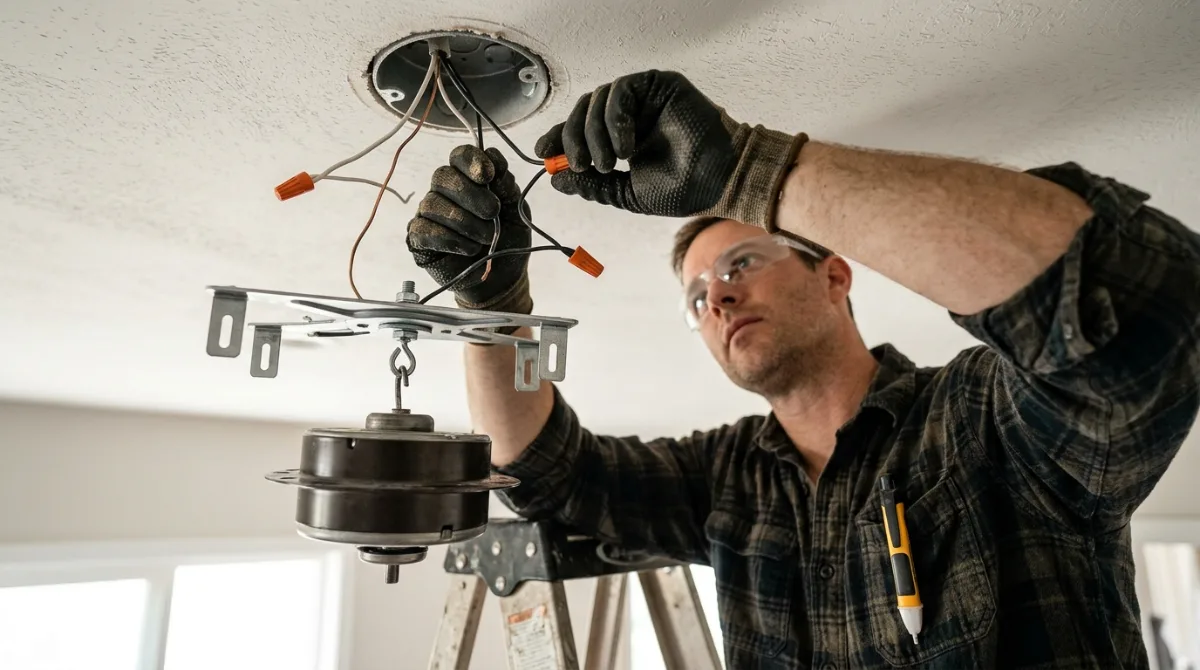
How to Install a Ceiling Fan Step by Step
Step 1: Turn off the power
Switch off the circuit at your breaker panel. Flip the wall switch on and off to confirm the light no longer works, then test the wires with a voltage tester once the fixture is down.
Step 2: Remove the old fixture
Take off the shade and bulbs, unscrew the fixture base and carefully lower it. Unscrew the wire nuts, test the wires again, disconnect them and remove the old mounting bracket.
Step 3: Check the electrical box
This step is critical. A regular light box is not designed to hold a heavy, moving fan. Look for a box marked “Acceptable for Fan Support” and screwed firmly to a ceiling joist or brace. If yours is not fan-rated, install a fan-rated box with an expandable brace bar that fits between the joists.
Step 4: Install the mounting bracket
Attach the bracket that came with your fan to the electrical box using the provided screws. Thread the wires through the center opening and make sure the bracket is tight and secure.
Step 5: Assemble and hang the motor
Follow your manual to attach the downrod (if used), feeding the fan wires through it. Then lift the motor and hang it on the bracket. Most brackets have a hook or ball-mount slot that holds the fan while you connect the wires, which is where a helper is useful.
Step 6: Connect the wires
| Wire from fan | Connects to ceiling wire | Purpose |
|---|---|---|
| Black | Black (hot) | Powers the fan motor |
| Blue | Black, or red if you have a second switch | Powers the light kit |
| White | White (neutral) | Completes the circuit |
| Green or bare | Green or bare copper (ground) | Safety ground |
Twist matching wires together inside a wire nut until snug, then give each a gentle tug to make sure nothing pulls loose. If your fan uses a remote receiver, it goes between the house wires and the fan wires as shown in the manual. Tuck the wires neatly into the box.
Installing a ceiling fan with a remote
If your fan comes with a remote control, a small receiver usually slides into the mounting bracket or fan canopy. Connect the house wires to the receiver’s input wires and the fan’s motor and light wires to its output wires, matching colors as shown in the manual. Set the same code on the receiver and remote if your model uses dip switches. Leave the wall switch in the on position so the remote always has power.
Step 7: Attach the canopy and blades
Slide the canopy up and secure it to the bracket. Next, attach each blade to its blade iron, then screw the blade irons to the motor. Tighten every screw firmly, since loose screws are the most common cause of wobbling.
Step 8: Install the light kit and test
Connect the light kit plug or wires, install the glass and bulbs, and turn the power back on. Test every speed, the light and the reverse switch. If the fan wobbles, use the balancing kit that came in the box.

How to Install a Ceiling Fan Without Existing Wiring
If there is no light fixture or wiring where you want the fan, the job gets much bigger. An electrician will usually need to:
- Run a new cable from a nearby power source or the panel through the ceiling and walls.
- Cut in a fan-rated electrical box supported by a joist or brace.
- Install a new wall switch or a fan speed control.
- Pull a permit and pass an inspection if your local code requires it.
Because this involves new circuits and in-wall wiring, it is not a good first DIY project. Hiring a licensed electrician keeps the work safe and up to code.
How Much Does It Cost to Install a Ceiling Fan?
Costs depend on whether wiring already exists, your ceiling height and local labor rates. According to This Old House’s 2026 cost guide, the average installation runs about $250, with most projects between $100 and $600.
| Job | Typical cost |
|---|---|
| Replacing a light fixture with a fan (existing wiring) | $100–$300 for labor |
| Complex install, high ceiling or new fan-rated box | $300–$600+ |
| Running new wiring where no fixture exists | $350–$2,000 |
| Electrician hourly rate | $50–$100 per hour |
| Handyman hourly rate | $25–$50 per hour |
| The fan itself | $50–$300 for most standard fans; smart fans cost more |
Doing it yourself saves the labor cost when you are replacing an existing fixture. For anything involving new wiring, the extra cost of an electrician is worth it for safety.
Which Way Should a Ceiling Fan Spin?
In summer, set the fan to spin counterclockwise when you look up at it. This pushes cool air down to create a breeze. In winter, switch it to clockwise on low speed to gently push warm air from the ceiling back down into the room. Most fans have a small switch on the motor housing or a button on the remote.
Common Ceiling Fan Problems and Fixes
- Wobbling: tighten all blade and bracket screws, check that blades are the same distance from the ceiling and use the balancing kit.
- Fan will not turn on: check the breaker, wall switch, pull chains and remote batteries, then confirm all wire connections are tight.
- Light works but fan does not: the fan may be set to off on its pull chain, or the black and blue wires may be swapped.
- Humming noise: often caused by a dimmer switch. Ceiling fans need a fan-rated speed control, not a standard light dimmer.
Frequently Asked Questions
How long does it take to install a ceiling fan?
Replacing an existing light fixture usually takes 1 to 3 hours. Installing a new fan-rated box or new wiring takes longer and is often best left to an electrician.
Can I install a ceiling fan where there is no light fixture?
It is possible, but it requires running new wiring and installing a switch and a fan-rated box. Because this involves new electrical work, hire a licensed electrician and check whether you need a permit.
Is it hard to install a ceiling fan?
Replacing an existing light fixture with a fan is a moderate DIY job. If you can turn off a breaker, follow a wiring diagram and safely lift about 20 to 40 pounds overhead with a helper, you can usually do it in an afternoon. New wiring or high ceilings make it much harder.
Can I install a ceiling fan myself?
In most US homes, yes, when you are replacing an existing fixture on a fan-rated box. Some areas require a licensed electrician or permit for certain electrical work, so check your local rules, and hire a pro if new wiring is needed.
Do I need a special box for a ceiling fan?
Yes. Ceiling fans must be mounted to an electrical box that is rated for fan support. Standard light boxes are not built to handle the weight and constant movement of a fan.
The Bottom Line
Now you know how to install a ceiling fan the safe way: kill the power, confirm the box is fan-rated, wire it correctly and tighten everything well. With the right size fan and the correct height, you will enjoy a cooler, more comfortable room for years. If anything about the wiring feels uncertain, calling a licensed electrician is always the smart move.
This guide is for general information only. Electrical work can be dangerous, and codes vary by location. Always follow your fan manufacturer’s instructions and local electrical codes, and hire a licensed electrician if you are unsure.