
How to Screen Record on Mac (With Audio, Shortcuts and QuickTime)
Recording your Mac screen is handy for all kinds of things: showing a coworker how to fix a setting, saving a video call, making a quick tutorial, or capturing a bug to send to support. You do not need to buy anything. Every recent Mac has a screen recorder built in, and it takes one keyboard shortcut to open.
Below is how to screen record on Mac with the Screenshot toolbar and with QuickTime Player, how to add audio, where your recordings end up, and what to do when something is not working.
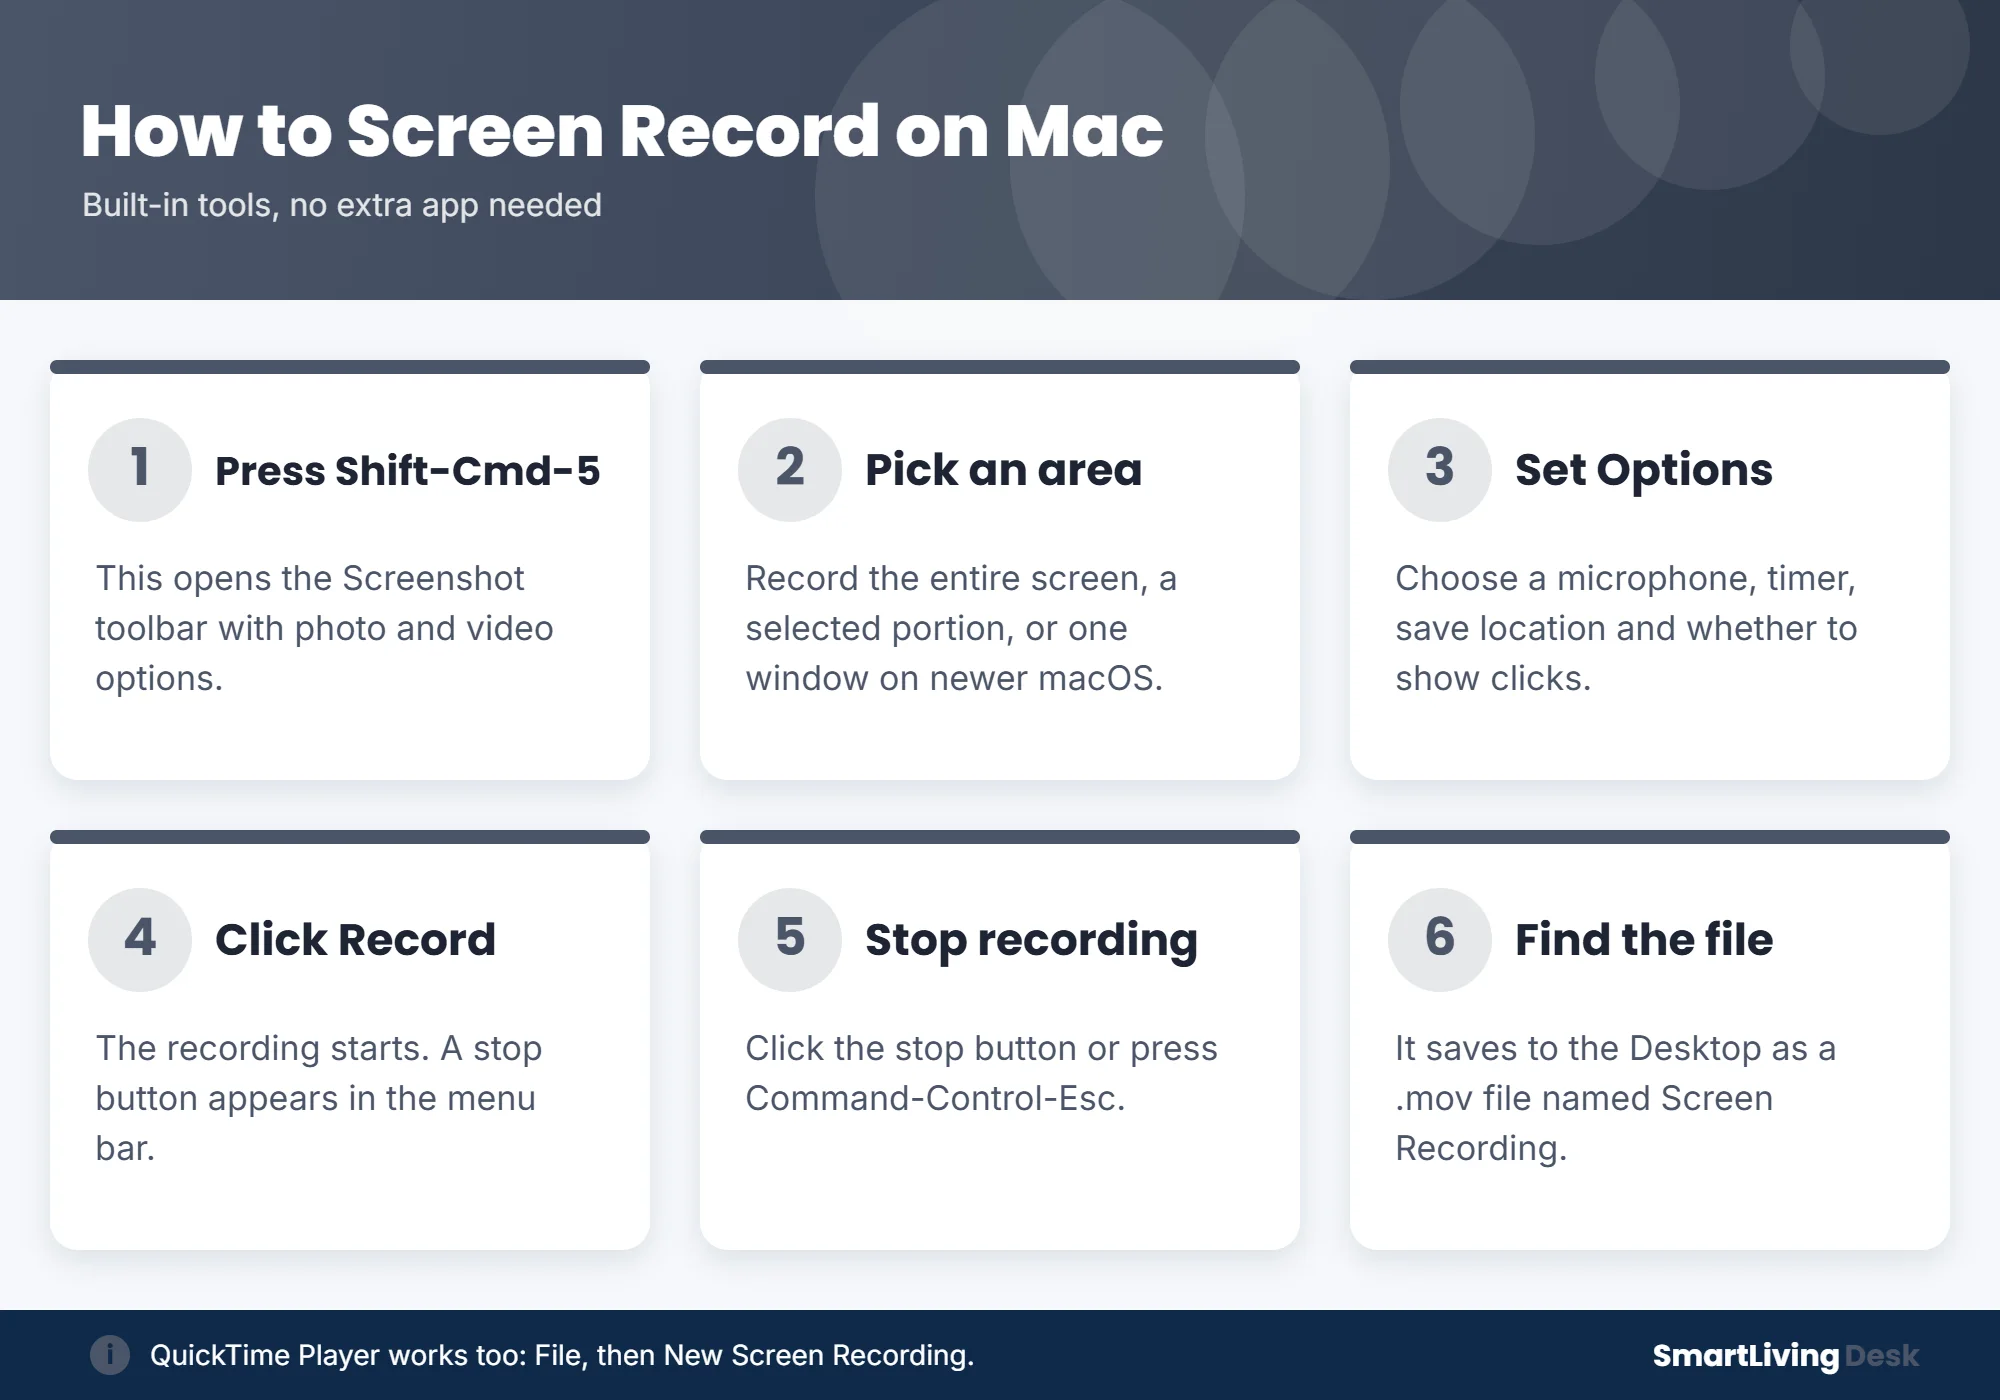
Quick answer: To screen record on a Mac, press Shift-Command-5 to open the Screenshot toolbar. Choose Record Entire Screen or Record Selected Portion, click Options to pick a microphone if you want audio, then click Record. To stop, click the stop button in the menu bar or press Command-Control-Esc. The video saves to your Desktop as a .mov file.
Method 1: Screen Record With Shift-Command-5
This is the quickest way and the one Apple recommends. It works on macOS Mojave and later.
- Press Shift-Command-5. A small toolbar appears at the bottom of the screen. The first buttons take screenshots, and the next ones record video.
- Choose what to record. Pick Record Entire Screen or Record Selected Portion. On macOS Tahoe 26 and later you can also choose Record Selected Window.
- Adjust the area if you picked a portion. Drag the edges of the box to fit what you want to capture.
- Click Options to choose a microphone, a countdown timer, where to save, and whether to show mouse clicks.
- Click Record. If you chose a single window, click that window to start.
- Stop the recording by clicking the stop button in the menu bar at the top of the screen, or press Command-Control-Esc.
- Edit or save. A thumbnail shows up in the corner. Click it to trim or share, or let it save automatically.

Method 2: Screen Record With QuickTime Player
QuickTime is the older method and still works well, especially if you want the recording to open right away for trimming.
- Open QuickTime Player from your Applications folder.
- Choose File and then New Screen Recording, or press Control-Command-N. On newer versions of macOS, this opens the same Screenshot toolbar as Method 1.
- Click the small arrow next to the Record button to pick a microphone and turn on mouse clicks if you want them.
- Click Record. Click anywhere to record the whole screen, or drag to select an area and click Start Recording.
- Stop with the menu bar button or Command-Control-Esc. QuickTime opens the video so you can play, trim or save it.
How to Screen Record on Mac With Audio
There are two kinds of audio people usually want: their own voice, and the sound coming from the Mac itself, like a video or a call.
Recording your voice (microphone)
Open Shift-Command-5, click Options, and choose a microphone under the Microphone section, such as the MacBook’s built-in mic or a headset. Your voice will be included in the recording. If you hear echo or feedback, Apple suggests wearing headphones.
Recording system audio (sound from the Mac)
For years, the built-in tools could not capture the Mac’s own sound. According to Apple’s support page, newer versions of macOS (macOS 27 and later) add an Include System Audio option in the Options menu. On older versions, you need a free audio driver like BlackHole or a third-party recorder such as OBS Studio or Loom to capture sound from apps, videos or calls.
One more thing: always let people know before you record a call or meeting. In many places, recording a conversation without consent is not allowed.

Where Do Screen Recordings Go on Mac?
By default, screen recordings save to your Desktop with a name like “Screen Recording 2026-11-11 at 10.15.32.mov.” To change the location, press Shift-Command-5, click Options, and pick a different folder under Save to, such as Documents or Movies. The setting sticks for future recordings.
Useful Recording Options
| Option | What it does |
|---|---|
| Timer | Waits 5 or 10 seconds after you click Record, giving you time to get ready |
| Show Mouse Clicks | Adds a black circle around the pointer each time you click, which helps in tutorials |
| Save to | Picks where the file is saved |
| Microphone | Chooses which mic records your voice, or none |
| Remember Last Selection | Uses the same area next time you record |
How to Trim or Edit a Screen Recording
Click the thumbnail right after you stop recording, then click the trim icon at the top. Drag the yellow handles to cut the start and end, and click Done. You can also open the file in QuickTime Player and choose Edit and then Trim, or bring it into iMovie for more editing like adding text or music.
Screen Recording Not Working on Mac?
- Black screen or blank video: Some apps, like Apple TV and other streaming apps, block screen recording to protect their content.
- Recorder does not start: Go to System Settings, then Privacy and Security, then Screen and System Audio Recording (or Screen Recording on older macOS), and make sure the app you are using is turned on.
- No sound: Make sure a microphone is selected in Options. For sound from the Mac, see the system audio section above.
- Shortcut does nothing: Check System Settings, then Keyboard, then Keyboard Shortcuts, then Screenshots to make sure the shortcut is still enabled.
- Running out of space: Screen recordings can get large quickly. Free up storage before a long recording.
If you only need a still image, see our guide on how to screenshot on a Mac. And if your Mac feels slow during recording, clearing the cache can free up some space.
Frequently Asked Questions
What is the shortcut to screen record on a Mac?
Shift-Command-5 opens the Screenshot toolbar with recording options. Command-Control-Esc stops the recording.
How do I stop a screen recording on a Mac?
Click the stop button (a small circle with a square) in the menu bar at the top of the screen, or press Command-Control-Esc.
Is there a time limit on Mac screen recordings?
No set limit. The length depends on how much free storage your Mac has.
Can I record just one window?
Yes. On macOS Tahoe 26 and later, choose Record Selected Window in the toolbar. On older versions, use Record Selected Portion and drag the box around the window.
What format are Mac screen recordings saved in?
They are saved as .mov files, which play in QuickTime and most video apps. You can export them as MP4 from iMovie if you need a different format.
The Bottom Line
To screen record on a Mac, press Shift-Command-5, pick the area, click Record, and stop with the menu bar button or Command-Control-Esc. Add your voice with the Microphone option, and use the newer system audio option or a free driver if you need sound from the Mac itself. Your video lands on the Desktop, ready to trim and share.